The character of the mower
*Input voltage: 110-240V, 50HZ
*Battery: 1pc 24V, 4.4Ah Li-ion battery
*Charging time 2A: 150 min
*Average working time per charge: 90 min
*Cutting cover area per hour: 50㎡
*Maxiumum cutting cover area: 1200m2
*Cutting height: 2.5-5.5cm(height adjustment by Rotary knob)
*Cutting motor speed: 3000R/M
*Cutting motor type: brushless motor(1pcs)
*Driving motor type: brushless motor(2pcs)
Mower Robot's Function parameter
*Intelligent spiral
*Falling sensor
*Lift sensor
*Tilt sensor
*Pressure sensor
*Rain sensor
*Bumping sensor
*Emergency stop switch
*LCD display
*Power failure auto-stop function
*Boundary line disconnect auto-stop function
*Automatically go back to charging station function
*Subzone function
*Scheduling function
*Self driving speed regulate function
*Time&Data set system
*Work schedule system
*Multi-lanuage
Anti-theft(pin code)
*Password protection
*Sound alarm
Never:
Store the equipment in a cold place. Instead, store it in room temperature.
Place the equipment next to a heat radiating unit, high temperature or fire.
Remove the product casing (warranty void).
Have direct hit or strong vibration on equipment.
Use the equipment if any connector is broken.
Touch the equipment or peripherals with wet hands.
Use the equipment in wet grass or during thunderstorm.
Let children or pets be in the vicinity of the equipment.
Put hands or feet near the blades.
Lift or carry the mower if the blades are moving.
Use the mower if any of the safety mechanisms is broken.
Use the charger if the power cord is broken.
Detach the charger by pulling on the cord. Take a firm grip of the connector and pull out.
Try to fix a broken power cord or the mower yourself. Always turn it in for authorized service at the reseller.
Important Notes When Using the Mower:
1)Make sure there are no items or vegetation(e.g. dropped pine cones) that might damage the mower on the lawn.
2)The slope of the lawn angle should be within 20o.
3)Switch off the power when the mower is not in use.
4)It is important to supervise the mower while working in order to avoid possible hazard situations.
5)In emergency situations, press the red emergency stop on top of the mower.
6)Please power off when not use mower, If long time no use, please charge the mower every 3 months.
●Automatic mowing and crushing
Intelligent planning of automatic mowing, automatic mowing and crushing of grass.
When the machine is low in power, it will automatically return to the charging seat for charging.
●Automatic avoid-obstacle
When the machine encounters obstacles, it will automatically retreat or avoid obstacles to go around.
When it rains, it can automatically navigate back to the charging seat (shelter from rain).
●Intelligent detection lawn
Automatic detection of the perimeter of the fence line around the lawn, intelligent planning automatic
adjustment of the mowing section work path and mode.
●Fixed password lock (fixed password)
The host has set a fixed password to power up with a password to prevent the child or other people who do
not know the safe operation to boot.
The RLYZ-4.1 with a tilt sensor that automatically stops the alarm immediately when one side of the machine is lifted over angle of 45 .
When the working RLYZ-4.1 is lifted off the ground by the artificial shell of the body, it will stopped immediately and it will alarm automatically.
●Intelligent safety protection system
When abnormal conditions or motor overload occur in the work, automatic shutdown protection immediately.
●Anti-collision sensor system
When the RLYZ-4.1 mowing grass encountered fixed obstacles or other resistance, the automatic obstacle avoidance system starts, the machine automatically retreats, adjusts the walking direction, avoids obstacle and resistance.
In case of a sudden situation, press the emergency stop key ,it will stop the work immediately.
Important Safety Warning:
●Do not let children or others who do not understand the safe operation of the machine to operate.
●If the safety equipment is damaged and the safety performance is invalid, do not operate the lawn mower.
●Do not operate lawnmower on slopes with slopes greater than 30%.
●Please check and clean all debris in the mowing area before the machine is in operation.
●Do not lift the blade while the machine is in operation; wear protective gloves when repairing the blade.
●When installing navigation fence line staples, wear eye protection tools and gloves.
●The Robotical lawn mower shall only be used by batteries, chargers and other accessories provided or recommended by the manufacturer.
●Do not remove and modify the battery, do not use strong impact, heating, burning the battery.
●Follow the power type and electrical parameters indicated on the charger.
●Do not use a charger in a damp-prone environment; do not use a damaged charger.
●Do not open the power-on charging station or try to connect the positive and negative charging electrodes
directly with the conductor to prevent electric shock and short-circuit accidents.
●Do not contact the charger and plug with a wet hand.
1.Installation of Charging Station:
A) The location of charging station must be even, firm and convenient to use the power source.
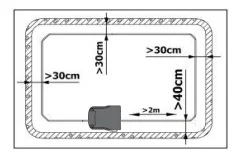
There must be no obstacles or corners within 2 meters in front.
B) First fix the front part of the fence line under the charging station. The distance to the lawn edge should not less than 40cm. Then correspond the fence line to the grooves under the charging station, and fix the charging station with pegs.
C) Please ensure that no objects or other items are located in the area marked in red in below picture, that obstruct the robotic lawnmower during edge cutting.
Note: The charging station must face the anticlockwise direction of the fence line. The charging station is forbidden to be
put on any inclined surface.
2.Installation of Fence Line:
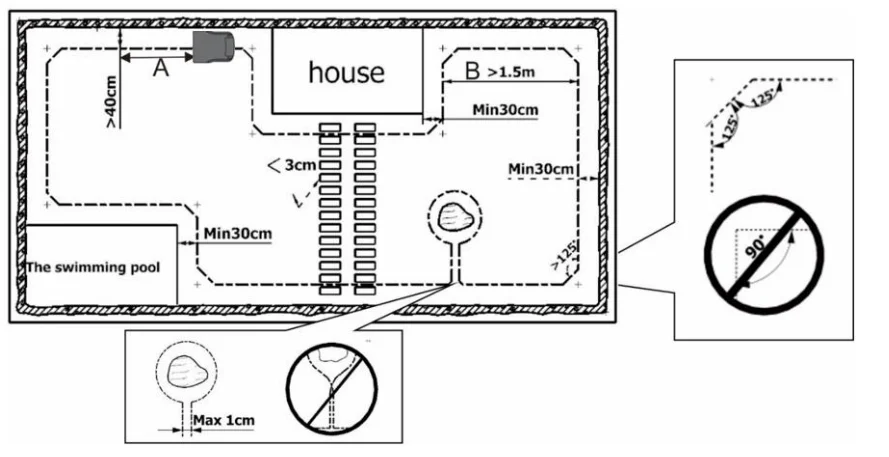
A)The fence line starts under the charging station, wiring in the anticlockwise direction along the lawn edge. It ends at the back side of the charging station. DON’T BURY THE FENCE LINE UNDERGROUND MORE THAN 2CM, THE SIGNAL WILL BE INFLUENCED OTHERWISE.
B)The fence line must pass through the middle of the charging station, and forward at least 2 meters (A).
C)The slimmest distance of wirings must be at least 1.5 meters interval. (B).
D)The fence line corner must have an inner angle of at least 125 o.
E)When there is a fixing facility or flower and tree in the lawn, isolate it as semi-ring-like island or ring-like island with the fence line to avoid any hit
F)Except the front 2 meters of the fence line from the charging station, the distance of the rest fence line to the lawn edge is not less than 30cm.
G) Fix the fence line tightly against the ground with the provided pegs. It is recommended that the pegs are inserted every 1
meter. The pegs can be put even closer each other if the ground elevation differs greatly.
DON’T BURY THE FENCE LINE UNDERGROUND MORE THAN 2CM, THE SIGNAL WILL BE INFLUENCED OTHERWISE.
H) After all the fence line is fixed, reserve 10-15cm terminals respectively for bothfront and tail ends. Strip the terminals to
reveal the copper lines for 2-3cm (Fig. A). Remove the nuts, fasten the copper lines on copper conductors. Then tighten the nuts (Fig.B). Front tail connects with the red pole, rear tail connect with the black pole. When the charger is connected to the charging station and the fence line starts to operate, the red lamp should be off

Note: Do not fold or repeat wiring with the rest fence line. Cut it instead (Fig. C)
Mowing Height:
The mowing height can be adjusted from 2.5cm to 5.5cm by adjusting knob beside the display panel.
Note : Make sure that the power is off before operation.
To protect the charging station from hitting by the mower, please put the fence line like below:
Please note:
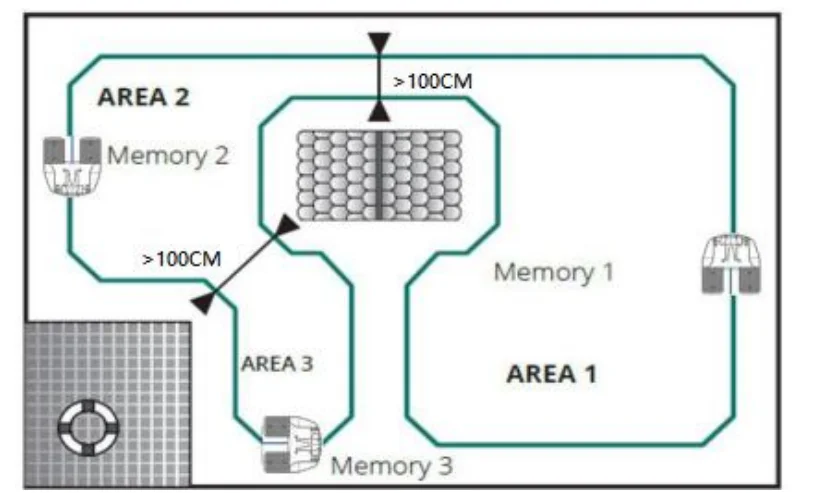
a) The starting point should be selected in such a way that it is located in the center of the sub-area to be mowed.
b) The minimum distance between two boundary wires should be more than 100 cm.
c) The sub-area function divides the mowing areas in up to three different sub-areas.
However, this does not mean that the mower mows only within the sub-area. It can also switch to and from between the individual areas.
d) If battery is weak during the sub-area function, and the mower returns automatically to the charging station, after completing the charging operation, it returns from there to the place where it had stopped earlier.
However, if the mower was stopped due to some other problem, it continues its work after the charging operation but not according to the settings. It begins again with the next day specified from the first starting point to the third starting point. – Put the mower in front of the charging station, turn it on, leave it there.
Note: The maximum work time is limited to 255 min. With a net work time of 255 min. charging time is not included.
Troubleshooting:
NOTE: For any fault of the machine, please always check the charging station first, to see if it is under proper working status(fence line is not loosen, or bite by your pets, or cut by the blades of the machine, or your AC power shut down when the machine is working). The lamp on the charging station will be red flashing if there’s such problem.
1. The mower does not start.
a) The mower starts in an ineffective fence line area. Check the fence line for repair.
b) Check the emergency stop switch. If the emergency stop switch is locked, press the emergency stop switch then press red power switch.
c) If the mower has not been used for a long while, the battery may be empty. Make sure to charge it again after charging. Even when unused, it isrecommended that the battery is charged every 3 months.
2. The mower does not move forward.
a) The bumper sensor may be damaged.
b) If the grass is very long(more than 12cm) at the first time, which will shelter the sensor tube, please mow the grass with a traditional lawn mower before using the robot mower.
3. The mower does not mow properly or at all.
a) Turn off the mower. Check if the blades are properly installed. Replace the blades if damaged.
b) If the mower is in a slope which has an angle more than 25 o, the mower will automatically stop.
c). The root part of the blade holder is stuck by objects or grass. Remove them and restart.
d) The grass is too dense to be mowed due to the automatic protection of machine.
e) the machine stopped automatically to protect the PCBs and other components when it tested the motor temperature is too high.
4. The mower crosses the fence line and continues outside the perimeter.
a)The fence line turn angle is too steep. The inner angle must be at least 125 o.
b) The fence line is too close to a slope. Adjust the fence line position to be in accordance to the recommendations.
c) The fence line signal is weak. The fence line must not exceed 200m. If you bury the fence line into the soil, make sure it’s no deeper than 2cm.
d) Check if there are any high-power appliance(such as transformer, generator,telecommunications tower, etc.) nearby. Those appliances could
interfere the machine signer.
5. The battery is not charging, or the mower does not charge properly, it bumps the charge station again and again.
a) The extruding poles of the charger are not in contact with the paddles of the charging station.
b) The extruding poles or the paddles are dirty. Clean them. (Make sure to disconnect the power before cleaning.)
c) If long time no charge, the left power will be exhausted by itself. If the battery broken a little you can re-charge many times to active the battery or you can change the battery.
d) The sensor of the machines is damaged.
6. The mower does not return to the charging station for charging.
a) The fence line is too long. The battery lever is not enough to return the mower to the charging station. Turn off the mower and carry it to the station.
b) If the mower was stopped by obstacle it will stop working
7. Subarea function is failure.
Every working area need to set working time.
8. The island can not work.
The island should be circle,not square。
9. The mower makes a circle in the island and never go to the working area.
The mower will go around about 3 circles, or about 120 seconds, depends on the size of the circle. Then go into the working area.
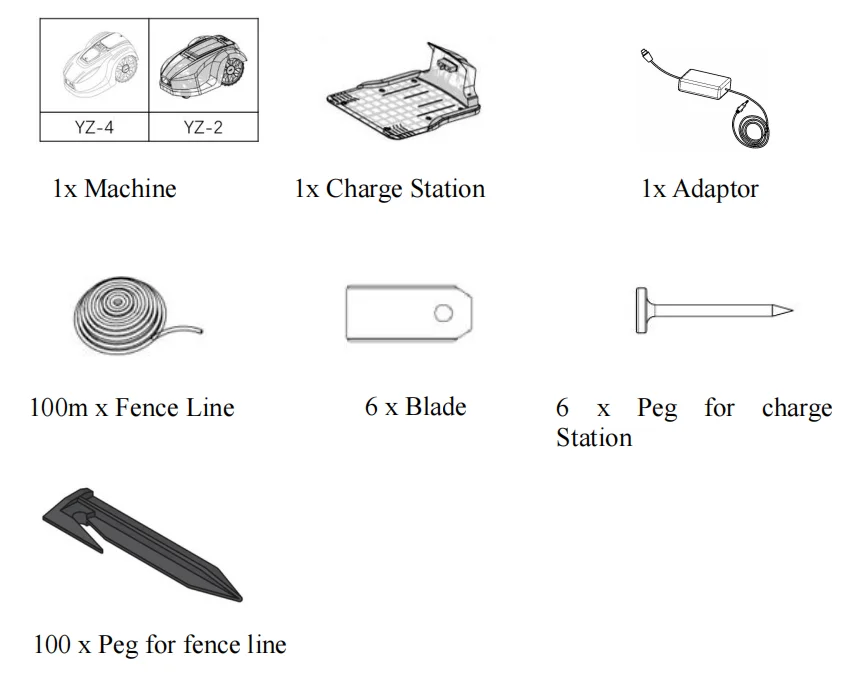
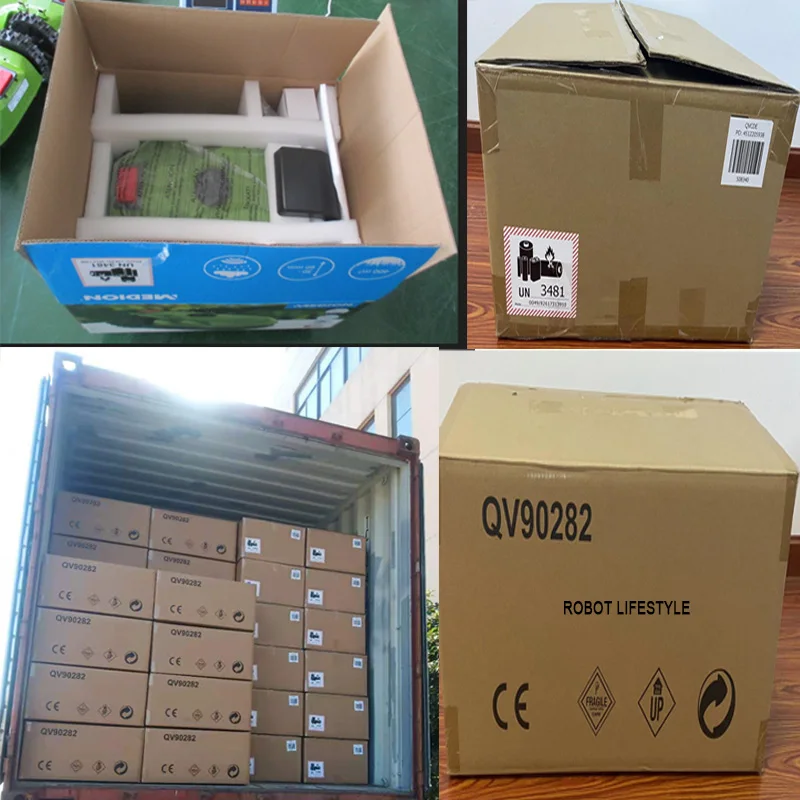
Packing:
MUST READ:
1. Please check you local customs duty policy before ordering, if the local customs needs to collect customs duties, all costs need to be afforded by the buyer.
2. Some remote areas of shipping method, for example DHL, requires buyers to pay remote fee.
3.Sometime if you chose the DHL,TNT,UPS,FEDEX,EMS,Aliexprss standrand shipping,Epacket,China post register air parcel,seller’s shipping way,Epacket,we will delivery it according to actual situation,and use Seller's Shipping Method.
4.If you from Spain or Portugal,and ship from China,pls chose the seller’s shipping method,which is not need customs tax.
5. The language of user's manual is English.
Please confirm that you can accept above before you buy.
6. Sometimes the package would delayed by the customs, bad weather, or other uncontrollable factors, if the protection time is going to run out but not delivered yet, please contact us to extend protection time.
7. Drop shipping is welcome. Please fill in complete and correct drop shipping address.
1.All our items (unless otherwise specified) are assured to be brand new and carried with fully at least 12 months warranty.
2.During warranty period, if any problem happens due to quality reason, please be cooperative to take photos or videos on the problem and send to us for verifying.
3.For confirmed product faulty on your approval, we can send you replacement parts free of charge. We will bear the shipping charge.
1. If you meet any problems, please do not leave us bad feedback directly, please contact us first, we will help you. Your messages will be answered in that day or within 1-2 business day. We shall try our best to solve your problem to your satisfaction.
2. We will give all customers 5 stars back. We sincerely hope that you could give us 5-star praise upon receipt of products too ,and upload your real buyers show. Your better comments will be an encouragement for us to offer the better quality and the better service in future. Thanks in advance!

